Alfred Dilluvio, Aqua Turf Irrigation Systems LLC
Traditional Irrigation Controllers are all relatively similar when it comes to function and programming. While they are not terribly difficult to operate, the following will certainly help new users understand their controllers and allow them to generate initial programs and make subsequent seasonal adjustments. The majority of irrigation controllers use both a dial and several buttons to achieve desired programming. What follows is a discussion of the programming for a Hunter Pro C irrigation controller. The same ideas can be applied to a Rainbird or a Toro controller as all manufacturers have basically adopted the same general layout (with some exceptions of course). Please call Alfred at 914 345 1350 ext 319 for any questions about your particular controller. Additionally, you can check out the following web page which will contain links to many different controller manuals
There are many different types of controllers out there. While some are definitely more intuitive than others, the basic principles are often the same. There is usually a main dial in the middle of the controller which allows the user to move through the different controller functions. For example, a dial on the Hunter Pro C allows a user to change between the following:
RUN: Although turning to controller to this setting will depend on what was done beforehand, a controller set to run will mean that it is set to deliver either a manual or automatic program. We will discuss this more in depth but it’s helpful to imagine the run almost as the “ON” button which will mean the controller is in the working mode.
SET TIME/DATE: A controller set to time/date means that the user can make edits to the current time and date. Using the buttons on the controller, we can add or subtract value to the time/date fields which will be easily discernible in the display on the controller. This will ensure that the controller knows the correct date and time, essential for the delivery of correct schedules
SET PROGRAM START TIMES: A controller set to program start times will allow a user to set the desired start times for each irrigation program. Usually controllers allow for multiple programs and they use letters to distinguish between each program. For example A, B, C… etc. There are many reasons a user might want multiple programs but we can discuss that at a later date. Additionally, it is important to know that controllers often allow a user to have multiple start times per program, which often causes confusion when creating a schedule. It is helpful to think of a program as a group of irrigation stations. We will discuss this further.
SET STATION RUN TIMES: A controller set to run times will allow a user to set the desired time each station (often referred to as a zone). Additionally, if a controller has multiple programs (or groups of zones set to run at a specific time) it is important that we are making edits to run times within the desired program. We will discuss this in greater detail and it will make sense I promise.
SET DAYS TO WATER: A controller set to days to water will allow the user to choose which days each program will run. This allows a user to control the frequency of irrigation by day.
SET PUMP/MASTER VALVE: A controller set to this function will allow the user to set the system up to work with a pump or a master valve. If the system is equipped with either, an irrigation professional should be consulted when first setting up this part of controller.
MANUAL SINGLE STATION: A controller set to manual single station will allow users to manually run a station for a specific length of time (without interrupting or changing existing automatic scheduling).
MANUAL ALL STATION: A controller set to manual all station will allow a user to run all the stations for a certain amount of time. A user can manually go through the stations adding or subtracting time for the manual run (without changing existing scheduling) or they can choose to manually run all the stations within a specific program (A B or C for example) and use the existing scheduled run time. This is confusing now but as with everything we begin to discuss, this will make sense! Its helpful to think of these manual runs as onetime events that do not change existing scheduling.
OFF: The off (sometimes called rain hold) allows the user to place the controller in a mode where it will not deliver the irrigation schedules that have been set up. Also, it may be used to interrupt manual or automatic runs in the event that the user wants irrigation to stop immediately. I always advise the homeowner to place their controller in the off position in the event of extended rainy weather.
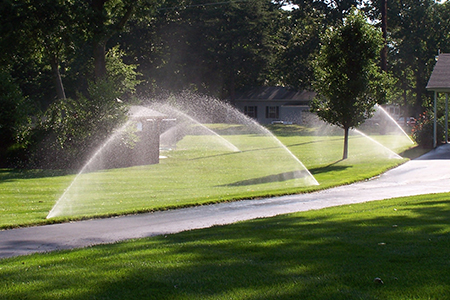
I want to include the following diagram which will give you a pictorial sense of an irrigation schedule.
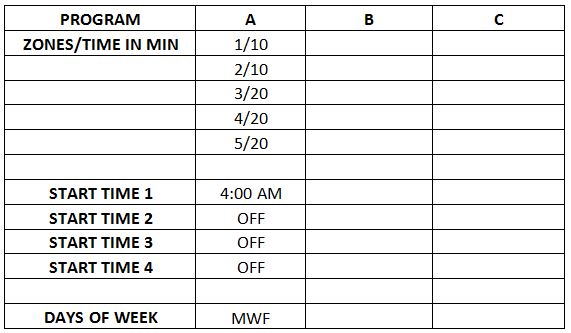
So if you look at the above diagram, you can see that Program A has ONE start time of 4:00 am and it is scheduled to run on Mondays, Wednesdays, and Fridays. It is important to notice that there are no additional start times assigned to program A. if there was an additional start time on program A, that program would start twice on Mondays, Wednesdays, and Fridays. Additionally, please note that there are five zones assigned to program A, those being 1, 2, 3, 4, and 5. When a program starts, each zone will run sequentially (never two zones at the same time), and at the length originally assigned. In this case, zone 1 will run for ten minutes, zone 2 for ten minutes, zone 3 for twenty minutes, zone 4 for twenty minutes, and zone 5 for twenty minutes. Therefore, program A will begin at 4:00 am and finish at 5:20 am. Program A has a total run time of one hour and twenty minutes. The following diagram will be slightly different to illustrate a different schedule type.
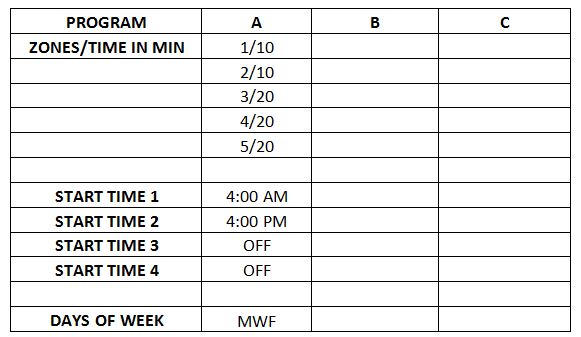
The only difference here is multiple start times on the same program which means program A will run twice daily on Mondays, Wednesdays, and Fridays. Why would someone want multiple start times on the same program daily? A perfect example would be a seed or establishment schedule where irrigation is needed twice daily to keep topsoil moist. The next diagram will illustrate the use of multiple programs.
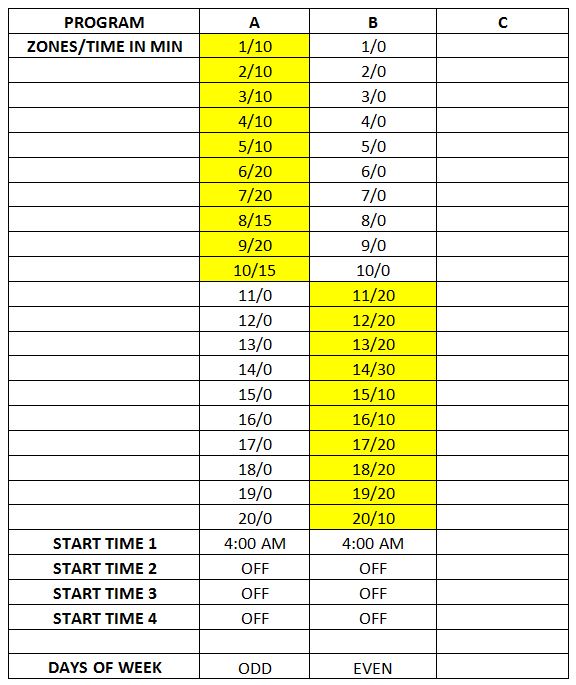
In this diagram, we see that there are now start times assigned to both programs A and B, and there are zones assigned to each program. The highlighted areas represent the zones assigned to each program Additionally, program A is set to deliver irrigation on odd calendar days (1,3,5…29) and program B is set to deliver irrigation on even calendar days (2,4,6…30). Why would someone want to use two different programs? For a system with many zones, it is important that the system doesn’t run too long each time it runs. For an area or property with limited water, or a limited watering window (duration of time allotted for irrigation), breaking up the system into programs ensures that the water source won’t be depleted and the watering window won’t be violated.
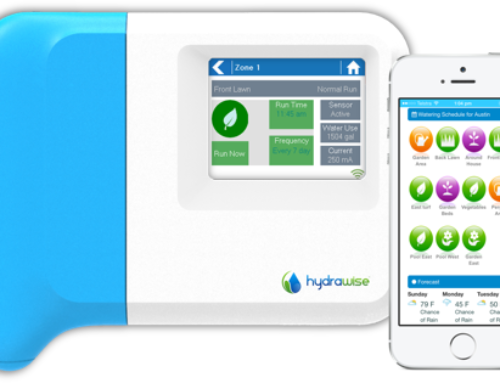
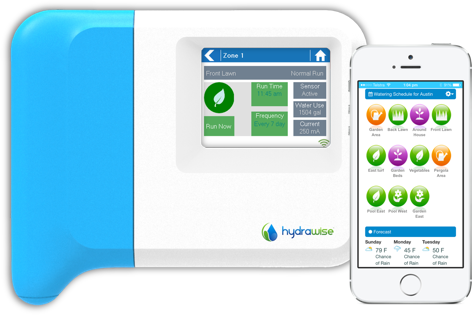
Now that we have an idea of how a schedule is created and the idea behind multiple start times and programs, let’s take a look at how an irrigation controller is actually programmed. The picture below shows the main panel of the controller.
![]() If you look at the image here, you can see five buttons in the top right corner: a plus, a minus, two arrow buttons, and a program button. The arrows allow you to move between fields while the plus and minus allow you to add or subtract values (add time to a zone, or change a start time). The program button allows users to toggle from one program to another. There will be a letter subscript in the display indicating which program is currently editable.
If you look at the image here, you can see five buttons in the top right corner: a plus, a minus, two arrow buttons, and a program button. The arrows allow you to move between fields while the plus and minus allow you to add or subtract values (add time to a zone, or change a start time). The program button allows users to toggle from one program to another. There will be a letter subscript in the display indicating which program is currently editable.
The first step to initial programming of the irrigation controller is to make sure the current date and time is correct. By turning the dial to set current date and time, you can now make edits to those parameters. You will see the year first (and it will be blinking). Any time you see a field blinking,that just means that it is what can currently be edited. Make sure the year is correct by pushing the plus or minus button until you reach the desired year. If you push the right arrow, you can move to the next field, which will be the month. It will be in numeral form, so 01 will correspond to January. Also there will be a subscript labeled month which will let the user know they are making changes to the month. After that is correct, push right arrow and move to the next field which is the day. Once again touch the plus and minus buttons to get to the current day. The same will apply for setting the time which you will have to do after the date is correct. Use the plus and minus to get the correct hour and then use the right arrow to advance to the minute using the plus and minus to add or subtract minutes until the time is correct. Also ensure that the am/pm is correct. In closing, you use the arrows to advance or regress through the fields, and the plus or minus to make edits. This will apply when the controller dial is in other positions as well.
Now, turn the dial to set program start times. You will now have the opportunity to edit the start times for various programs. Using the program button, press it until you see the letter A in the display. It will also say 1 off. That is referring to start time 1 for program A. You want to add value to that 1st start time with the plus button. You will start at 12:00 am and move to the desired time by pressing the plus button. If you get to the desired time you would like to set for start time 1, press the right arrow which will take you to start time 2 for program A. Make sure it says 2 off. Hitting the right arrow again will take you to start time 3, make sure it is off as well. Then hit right arrow to move to start time 4. Make sure it is off as well. So now you have one start time for program A. If you desire another, use the right arrow to advance to start time 2 for program A, and use the plus button to assign the time desired. Does this make sense? You can use the left arrow if you desire to regress between fields but most prefer to keep using the right eventually coming back to the correct field. If you want to program a start time for program B, hit the program button until a subscript B appears. Follow the same directions to assign a start time for program B. *please note that a program will not run unless there is a start time assigned to it. Also make sure that there are not multiple start times assigned unless that’s what is desired*
The next thing we will want to do is assign run times to each zone. Turn the dial to set run times. Again, I would like to reiterate the importance of the program button. If the subscript in the display is not the program we desire to make changes to, hit the program button until you get the desired letter (A,B,C…). Now, if we are in set run times, the numbers we see in the display will correspond to stations or zones. The presence of a 1 will mean we are able to edit the time assigned to zone #1. Using the plus button, add time (in minutes) to each station that you want to be a part of program A. Then you can use the right arrow to move through zone by zone, adding time as you see fit. If you want all your zones to be on one program, all you have to do is assign time on those zones under program A. If you want half of the zones to run on Program A, and the Other half on B, just make sure you divide it up that way. (for example, zones 1-10 on Program A, with 11-20 on Program B. That means that in set run times under Program A, you will have to assign time on 1-10 while making sure 11-20 are all set to 0. On Program B, you will have to assign time to 11-20 while making sure 1-10 are set to 0. Does that make sense? Once you have the time assigned to each zone, you can move on to the next step to programming the controller.
Turning the dial to set days to water, you can now use the right arrow to advance through a few different watering frequency options. Odd/even mode, day of the week mode, or interval watering. Although many controllers offer similar settings, some do not. Please call us at the office if you have any questions about your specific controller. Once again, if you are in set days to water, the program button should be pushed until you see the letter of the program you wish to edit in the display. If there is an A, we are editing the watering frequency for program A. As we discussed, there are several modes we can use. If it says Odd or Even in the display that means A is watering on either odd or even days. If the right arrow is pushed and the days of the week appear on the display, we are in day of the week mode. The presence or absence of a small rain drop above each day of the week means irrigation either will or will not take place on that day. When a particular day is blinking, that means it can be added as an irrigation day or removed as an irrigation day. And how? By using the plus or minus buttons to add or remove rain drops. Interval watering can be used but I do not recommend it often. When it is in interval mode, you will see INT in the display and it will show two numbers. The number on the left is the interval between watering days, and the number on the right is the number of days before next irrigation event. This feature is convenient if you want a consistent watering schedule regardless of the day of the week. Day of the week watering is the trickiest setting to get right so if there are any questions, please give us a call in the office.
As we discussed earlier, setting the dial to Set Pump or Master Valve will give the user the option to turn on the pump or master valve with each zone. It is important to consult the irrigation professional who either installed or has intimate knowledge of how the system works.
Now that we know how to set the irrigation controller, lets discuss two important features now offered on most traditional irrigation timers, those being single and all station manual run. These functions allow a user to run one single station or all stations manually for any length of desired time without interrupting existing scheduling. When would this be handy? If you had some new plants put in or some seeding done in zone #4, it might be good to do a manual single station run during the hot part of the day to give those plants a little extra water. By turning the dial to single station run, and then using the arrow to get you to the correct zone, you now have the option to add or subtract time on that zone without affecting regular scheduling. Once the time has been programmed, turning the dial to run will start that zone and it will run for the duration of time selected. Because the dial is set to run to activate this single station, when it completes, you will already be in the run position and it will revert back to its regular scheduling. If you want to run all zones on the system for a specific time, turning the dial to manual all station will give you the option to do a one-time run of the entire system for any length of time you want. If you want to run a program with the existing automatic scheduling, just hit program A, B, or C… and then turn it to run. This will run an entire program using existing automatic scheduling. As before with the single station run, when it completes, you will already be in the run position and it will revert back to its regular scheduling.*please note that when the controller is delivering irrigation, a small sprinkler icon will appear in the display indicating that an irrigation event is taking place*

